기기에서 나는 험으로 고생하는 경우가 많다.
기기가 노후 해 자체적으로 험이 발생하는 경우도 있지만 기기간의 접지 전압 차로 인한 그라운드 루프로 인해 험이 발생하기도 한다는데... 오늘은 전원 극성 일치시키기와 그라운드 루프 해결을 알아보았다.
인터넷에서 여러가지 자료 중 알기 쉬운 자료들을 인용해 본다.
[Hum을 없애는 방법]
요약하면 Ground loop을 제거 하려면 기기 중 하나만 접지 시키고 나머진 접지 시키지 말아라!! 그리고, TV와 연결되어 있다면 이것은 별도로 해결해야 한다….
What you need is to have only one component three-wire connected to an AC receptacle (wall or line conditioner). All other components should be two-wire connected only.
To repeat: regardless of where you have your components plugged in -- wall outlets, plug strips, or power conditioners -- only one component should be three-prong connected. All other component cords must be only two-prong connected.
If You've Done All That But Still Have A Problem . . .
. . do you have a TV cable hooked to your system?
Perhaps through a VCR? That's another, second, ground. That TV cable is also grounded, but it's not a real safety ground. You wouldn't want to count on it in the event of a power fault.
If you have cheated all but one of the AC plugs and you still have a hum, you can disconnect the TV cable and see if the hum goes away. If it does, then you'll need to isolate that cable ground. There are a few ways you can go about isolating the system from the cable TV ground:
The Ground Rules
Of all the annoyances that can afflict any audio/video home theater or even a simple stereo installation, the notorious "ground loop" may well be the most difficult and persistent one to track down and eliminate. A "ground loop" is caused by the difference in electrical potential at different grounding points in an audio/video system. (All the grounds in an A/V system should ideally be at "0" potential.) A ground loop typically adds a loud low-frequency hum or buzz as soon as you plug in any of various audio or video components, including subwoofers, cable-TV outboard boxes, satellite-TV feeds, TV displays, amplifiers, A/V receivers or turntables. The buzz/hum is a byproduct of the multiple power supply cables and a ground voltage differential within your system and its network of interconnecting cables.
Here are some methods to help you get rid of ground loops. Try these first and don't waste money on a power "conditioner" which, in most cases, won't help. (There is no need to "condition" the AC power for your system. Your receiver or amplifier already has a power supply with its own filters and transformers. No further filtering is normally required.)
- If you get your system up and running and hear an audible buzz or hum, the first culprit to look at is either the powered subwoofer or your cable-TV or satellite-box feed at the entry point to your system.
- First, the subwoofer: unplug the coaxial cable that connects to your powered subwoofer to see if the ground-loop hum disappears. If it does, it's likely coming in through your cable/satellite TV feed.
- Reconnect your subwoofer's coaxial cable from the subwoofer input to your receiver's subwoofer output and disconnect the cable-TV feed (or satellite feed) from your outboard set-top cable box or satellite tuner. Be sure and disconnect the cable before any splitters. Now see if the hum/buzz from your subwoofer stops.
If that eliminates the hum, you can install one of these inexpensive in-line ground isolators from Parts Express or Bass Home. Note that these transformer-based ground isolators will work fine with analog cable-TV feeds, but depending on their design they may interfere with or block reception of HDTV signals via a digital cable or satellite dish feed.
Install the ground isolator between the cable-TV feed and the input of your outboard cable-TV box or satellite tuner (or the TV display's antenna or cable input if you have a set with a built-in TV tuner or a cable-card ready set). In many cases, the ground isolator will "break" the loop and remove the annoying hum or buzz by isolating the TV-cable ground.
If a hum remains with the TV cable completely disconnected from your system, or you don't want to risk degrading reception of HD signals from a cable or satellite system, then you may have to add a ground isolator like this Radio Shack Model 270-054 between the line-level coaxial subwoofer cable from your A/V receiver and the line-level input jack on your powered subwoofer.
In all cases, if your subwoofer has a ground-lift screw like some of Axiom's subwoofers, try first removing the screw (or replacing it) to see if it increases or eliminates the hum. It may or may not make a difference.
If you do not have easy access to the aforementioned ground isolators, here are a few more tips:
- Try plugging the subwoofer into a different AC outlet in the room, one that isn't supplying power to your components (A/V receiver, TV, cable box, etc.). That might fix it.
- Try reversing the AC plug for your A/V receiver or the powered subwoofer. If it's a 3-wire plug or a polarized plug, which has one prong wider than the other, you won't be able to reverse the plug. For safety, do not use a "cheater plug" to bypass the 3-wire plug.
- With the power OFF, reverse the AC plugs one by one of any other components that have a standard 2-prong AC plug that isn't polarized. Each time you reverse a plug, turn on the system with the attached component and your subwoofer and see if the hum disappears. In some cases, reversing one or more plugs will eliminate the hum.
If you have a turntable, try connecting a separate ground wire to a chassis screw on your preamp or receiver and see if the hum disappears. If you already have a turntable ground wire, try removing it from the preamp. one or the other may eliminate the hum.
Finally, here is another solution that worked well for a member of our message boards who decided to discard his ground-loop isolator on his subwoofer: "I took off the ground-loop isolator I'd been using and connected a plain 14-gauge wire to chassis screws on the sub and the receiver then powered everything on. Although hum was still there, it was far lower than before. Next I unscrewed the ground-loop screw on the back of the sub and that took care of the hum completely."
1. 모든 오디오 기기의 전원 극성을 일치시킨다.
주안점: 모든 오디오 기기는 접지 전압이 다르다
가정용 전원 전선 중 하나는 땅(어스)으로 접지 (ground) 되어 있다.
한편, 전기 기기의 샤시에는 교류의 전류가 흐르고 있다.
심한 경우 (특히 PC의 경우), 손으로 짜릿 짜릿한 전기를 느낄 수 있는 경우도 있습니다.
재미있는 사실은 샤시와 어스 그라운드 접지사이의 전압 (이하 “접지전압”이라 칭함) 은
전원 플러그의 방향에 따라 달라진다는 것이다.
한번 시험해보십시오.
또 다른 사실은 오디오 기기마다 접지 전압이 다르다는 것입니다.
개별 오디오 기기로서는 완벽할지라도 조합된 상태에서는 조건이 달라지고 그 성능도 달라진다.
그 중의 하나가 접지 전압입니다.
접지 전압의 차이는 음질에 심대한 영향을 줍니다.
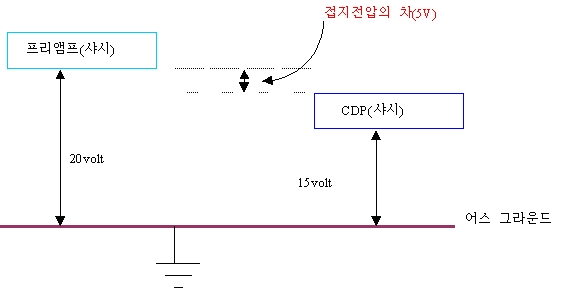
예를들어 프리앰프의 샤시와 접지간에 전압이 20volt이고,
CDP의 샤시와 접지간에 전압차가 15volt라면,
프리앰프의 그라운드(샤시)와 CDP의 그라운드(샤시) 사이에는
5 볼트의 접지전압의 차이가 존재한다.
이러한 접지 전압의 차이는 곧 그라운드 루프 ground loop (동일한 그라운드임에도 위치에 따라
전압차가 존재하여 그라운드 상에 전류가 흐르는 형상) 형성합니다.
위의 그림과 같은 경우, 인터콘넥트 케이블을 연결하면
접지 전압이 높은 프리앰프의 그라운드에서 CDP의 그라운드로 전류가 흐르게 됩니다.
이러한 그라운드 루프는 음질의 악화를 초래하며 심하면 Hum을 유발할 수 있습니다.
이러한 기기간의 접지전압의 차이를 최소화하는 것이 음질 개선의 한 방법입니다.

준비물: 멀티 테스터 (multi-tester) 또는 전압측정기
아나로그 방식의 멀티테스터
Digital Multi-tester
웬만한 멀티 테스터는 2 ~ 5만원 정도면 좋은 것을 구입하실 수 있습니다.
[개선 방법]
오디오 기기의 샤시와 접지간의 전압을 측정하는 방법은 이렇습니다.
(1) 먼저 전원 코드이외의 모든 인터콘넥트 케이블은 제거해야 합니다.
(참고: 인터콘넥트 케이블이 연결된 상태에서는 기기간 접지전압의 차이를 측정할 수 없습니다).
혹, 어스 접지가 되어 있으면 그 접지선도 제거하십시오.
파워 앰프는 스피커 케이블도 제거하십시오.
(2) 측정하려는 오디오 기기의 전원 프러그를 콘센트에 꼽고 전원 스위치를 넣습니다.
(3) 테스터의 선택노브를 AC에 놓고, 측정핀 1개는 샤시의 금속 부분에 대고
(4) 다른 측정핀 끝을 손으로 잡거나 라디에터 등의 금속 부분에 접촉합니다.
(5) 이때 테스터에 나타나는 교류 (AC) 전압을 읽습니다.
(6) 전원 프러그 방향을 바꾸어 꼽고 똑같은 방법으로 교류 전압을 잽니다.
프러그의 방향에 따라 전압이 다르다는 것을 알 수 있을 것입니다.
샤시와 어스 그라운드 접지의 전압차이가 높으면 높을수록 샤시와 어스 그라운드 사이가 멀다는 뜻입니다.
따라서, 반드시 전원 프러그는 샤시와 어스 그라운드 접지간의 전압차이가 작은 쪽으로 연결하는 것이 원칙입니다.
실제 측정의 예
A. 처음 측정시 : 샤시와 어스 그라운드간의 전압: 52Volt AC
B. 전원 플러그를 바꾸어 꼽고 측정했을 때 : 샤시와 어스 그라운드 간의 전압: 27.5 Volt AC
결론: 위의 경우 접지 전압은 A보다 B가 낮음. 따라서, 전원 플러그는 B에 맞게 꼽아야 합니다.
이렇게 방향을 확인한 다음에 그 방향을 잊지 않도록 콘센트와 프러그에 방향을
매직펜이나 적당한 것으로 표시를 해 두십시오.
그런 다음 다른 기기의 방향을 똑같은 방법으로 찾아서 표시를 합니다.
모든 기기의 방향을 확실히 찾은 다음 그 방향에 맞게 모든 전원플러그를 꼽고
그 다음에 인터콘넥트 케이블을 연결하십시오.
한결 드높아진 해상도를 느끼실 수 있을 것입니다.
'잡학사전' 카테고리의 다른 글
| 전동드릴 사용법 (보쉬 GSB 10RE) (0) | 2009.02.17 |
|---|---|
| 슈어 Cartrige & Stylus (0) | 2008.12.20 |
| 이상적인 파워앰프 볼륨 셋팅?? (0) | 2008.10.22 |
| 밸란스 연결과 언밸란스 연결 (0) | 2008.09.01 |
| S/N비란? (0) | 2008.02.29 |